Thursday, November 18, 2010

Persimmons!

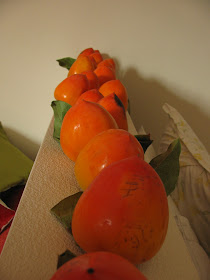
It is persimmons season in California. There are two varieties: Hachiya and Fuyu. The Fuyu variety shaped like a flat apple, can be eaten while it is firm, and has a crunchy texture. Look for fruit that is uniformly orange and there are no black spots indicating sun burn.The Hachiya variety is shaped like a tear drop, these need to be allowed to ripen on the counter until they are soft like a jelly. They are amazingly sweet and addictive. Persimmons are loaded with Vitamin A, one medium size persimmon contains about 50% of daily Vitamin A requirement; they are also high in Vitamin C and fiber.


Hachiya on the left and Fuyu on the right.
Stash of Persimmons that I am allowing to ripen! I bought a stash of 20 lbs from someone who has a huge Persimmon tree in their backyard, I couldn't buy a better quality fruit even at the local farmer's market.

A common source of confusion when it comes with Hachiya variety is when is it ready to eat. The key is to let it ripen to the point that it feels like jello. I have added a picture below to show you how the surface should feel. You will notice that when I press it with my fingers it creates a depression and you can see wrinkles on the surface. This persimmon is ready to be eaten, if you don't allow it to full ripen it will have a chalky flavor that will dry your mouth, which is not a very pleasant experience.

 

Sunday, November 14, 2010

Nutritious Breakfast for 80 cents

Here is a simple inexpensive recipe for steel cut oats that I prepare every morning. It is healthy, nutritious, and easy to prepare.


Ingredients:
  • Steel Cut Oats (0.5 cup)
  • Water (1.5 cup)
Soak the steel cut oats in a pressure cooker (I use Kuhn Rikon Duromatic pressure cooker, but any pressure cooker would work) overnight. The soaking is optional, I find that the soaking makes the grains softer and they taste better when cooked subsequently in the pressure cooker.

Turn the heat to high and let the pressure reach the first red ring (8 psi above atmospheric pressure). Reduce the heat immediately to low and let cook for 10 minutes. Allow the pressure to drop naturally, another three to four minutes, and the cereal is ready. One could also cook the oats on the stove top or microwave, however I prefer the pressure cooker, it is easier and faster.

Toppings: Use your favorite toppings to complete the cereal, I like walnuts, raisins, and milk.


Nutrition Information:
Total Calories: 650 Calories
Protein: 18 grams
Fiber: 16 grams

Cost and Source of Ingredients:
  • Steel Cut Oats (0.5 cup, 90 grams): 20 cents [$1.09/lb in bulk, Berkeley Bowl]
  • Whole Milk (0.5 cup): 20 cents [$3.29/half gallon, organic milk]
  • Raisins (1.5 oz., 40 grams): 20 cents [$2.29/lb, Berkeley Bowl]
  • Walnuts (3 whole walnuts, 6 half pieces, 16 grams): 20 cents [Whole fresh walnuts at $2/lb from Kaki Farms at Berkeley Farmers Market]
  • Total cost of breakfast: 80 cents.

Tuesday, November 9, 2010

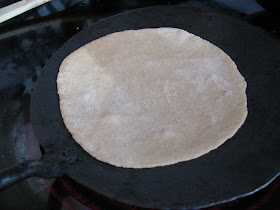
How to make Roti(रोटी)


Every morning millions of households in India churn out rotis. It is the simplest form of bread in the world, along with the Mexican tortilla. The ingredients are whole wheat flour and water, and nothing else. Other than a rolling pin, all that one needs is a flat pan or Indian tawa(तवा) and a source of heat. What can be simpler than that? I don't know the historical origins of roti, but I am willing to bet that the original inhabitants of the Harappan civilization in the Indus Valley were probably making roti in 2000 BC.

Ingredients: Whole wheat flour. One could use any whole wheat flour from any of the bulk stores in US(example: Berkeley Bowl or Whole Foods), however I have found that the best flour is the one that is imported from India. For whatever reason, the rotis made from Indian flour turn out better, they puff easily and also taste better. It may have to do with how the flour is milled or perhaps the type of wheat. I have no idea what the reason behind this is, but I have had good luck with Sujata Chakki Atta.

I typically use one cup of flour and about half cup of water, the exact amount has to be tweaked depending on the flour. The recipe produces eight rotis, this is a lot and meant for one hungry adult.

Utensils: Any flat pan would do, but the ideal shape is the Indian tawa(तवा), it has a slight curvature that seems to produce better rotis. I prefer the heavy cast iron ones, because they can retain more heat.

Recipe: Add half cup of water to one cup of flour and knead the flour by hand in a mixing bowl. Add additional water to make the dough with a smooth texture. Break small balls of dough and roll in to a ball by hand. Press the balls and flatten them in to a circular shape by hand. Sprinkle flour on both sides and roll the dough with a rolling pin. To keep the shape circular, rotate the flattened dough as you roll it. It takes a lot of practice to get them perfectly round, mine are a bit squarish, this only impacts the aesthetics, remember I am not competing with the Indian housewives here.


Heat the flat pan to a medium heat. Toss the flattened dough on to the surface of the pan. Make sure the pan is not too hot, if it is too hot then the dough will stick to the surface, at the right temperature the dough can still slide around easily.


Wait for small bubbles to form all over the roti. These bubbles are formed by the water in the dough turning in to steam. Flip the roti, and let another set of bubble form on the other side. Then flip again, and start spot pressing with a kitchen cloth. This locally heats the roti and creates even larger steam filled pockets, I flip it once more and press locally again covering the entire area. Pretty soon the entire roti will puff up. Typically, the first roti that I make does not puff as much as the subsequent ones. This is most likely because the pan is not hot enough.


I transfer them to a plate and cover them with a kitchen cloth to keep them warm.

Nutritional Information: 1 Cup of whole wheat flour(132 grams) has a total of 440 calories, 16 grams of protein(for the protein junkies), 96 grams of carbohydrates, including 12 grams of fiber(almost 50% of ones daily fiber requirements!). Other than that there is Iron, Thiamin, Riboflavin, and Niacin. Cost of 1 cup of flour: 18 cents.

Sunday, November 7, 2010

Aloo Thinchori [आलू थिंचोडी] (Stew made with thrashed potatoes)

Here is a recipe that I learned from my mom, it originates from the Garhwal region in India. The recipe uses new potatoes, that have just been taken out of the ground and have a really thin and delicate skin, with a strong potato aroma. I found these potatoes at the Berkeley farmers market at the Full Belly farm stand. The key step is to thrash the potatoes which tends to create a stronger potato flavor than what one would obtain by cutting or chopping.

Ingredients:
2 lbs of new potato (From Full Belly Farm)
6 little shallots (I find shallots to have a more intense flavor compared to red and white onions)
3 cloves of garlic
Spices: Turmeric (half teaspoon), ground coriander(1 teaspoon), cumin seeds (2 teaspoon), salt(to taste), dried red chilis(three to four), chili powder (half teaspoon).
First thrash the potatoes, I put them in a plastic grocery bag, and used a rolling pin to thrash them. One really needs a silbatta(an Indian stone to thrash them), but I had to improvise.
Heat the karahi(wok) and put some mustard oil (four table spoons), crush the cumin seeds with a mortar and pestle (I use the Japanese suribachi). Add the seeds to the oil. Toss in the garlic, I just crush the cloves with the wide end of a chef's knife. Then add the dried red chilies, I cut them coarsely. Add the shallots and fry them until the onions are golden brown.
Add the potatoes and stir them to coat them with the oil. Add the spices, turmeric, coriander, red chili peppper, and salt and stir the contents. The spices should be added after the potatoes have been added to the karahi, this distributes the spices better than if one were to add the spices with the shallots.
Next add water, cover the karahi, and cook on medium heat for about twenty minutes until the potatoes are done. Add an appropriate amount of water depending on how soupy one likes their stew. I like it on the thick side as you can see in the final picture.
Eat with rice or roti, I prefer roti.